

How To Make A Game Design Background
Creating backgrounds for 2D games is easy. You create a bunch of bitmaps in your favorite paint programme and you're done. Creating backgrounds for 3D games can be much more difficult if y'all don't know what y'all are doing. The earliest games (both 2nd and 3D) were set in deep infinite, because drawing a few stars on a completely black background is fast, easy, and requires no creative talent. Game players today demand more interesting graphics.
Some game developers solve the 3D background problem by sweeping information technology under the carpeting-using one of several techniques to hibernate the background. For example, the game'southward scenery completely fills the screen in top-view games like SimCity or Control and Conquer. Indoor games like Descent also make full the unabridged screen with game scenery. Fog is sometimes used to make distant object dissolve into a background that is just a unmarried fog colour. These techniques make the game feel either two-dimensional or claustrophobic.
Driving games can cheat and use a single bitmap that is scrolled left/right/upward/down as the actor drives around the rail. This works pretty well, considering the players are limited to driving on a pre-determined path and they never await straight upwardly at the heaven.
However, if y'all want to create a 3D game that allows the histrion unrestricted movement and makes them feel like they are in an unlimited 3D world, yous need to learn to create 3D backgrounds, otherwise known as skyboxes. The rest of this commodity explains how to create realistic skybox backgrounds for your 3D games.
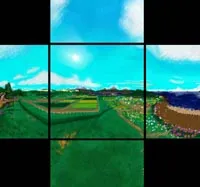
Figure one
A skybox is a cube made of half-dozen images that surrounds the game role player. Effigy 1 shows a slightly exploded view from inside a skybox. Skyboxes are also known as environs maps. The histrion stands in the middle of the box, so no matter which way they plow they see some part of the box. The game engine figures out which parts of the skybox are visible and displays the proper pixels as the player moves. The player is never enlightened they are within a big cube; see Figure 2 for 3 snapshots of what the role player when turning inside the skybox of Figure i.
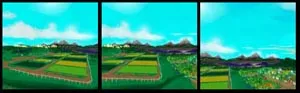
Effigy 2
Skyboxes are drawn equally if they are infinitely large--no matter how far the player moves, they are still surrounded by the box. But objects that the thespian tin can never achieve will wait correct, similar clouds in the sky or afar mountains. If the player's motion is limited to but looking around (rotating their head) from one spot, and then a skybox tin can be used even for nearby scenery.
Skyboxes expect neat, if they are created properly. They create the illusion the player is in a large, seamless globe. Just the illusion is speedily shattered if the borders between the skybox images don't match exactly, or if you create images with the wrong perspective. This article will give y'all a good understanding of skyboxes and related technologies, and will aid y'all avoid fourth dimension-wasting mistakes by describing several techniques for creating skyboxes.
Related Technologies
Skyboxes get by several other names, and have many other uses besides game backgrounds. The technical term for a skybox is cubic environs map or cubic reflection map. They were invented over twenty years ago every bit a fast method for computing reflections when rendering objects, and are oft used by high-quality rendering software such equally 3DStudio MAXand RenderMan.
You lot may be wondering how reflections relate to game backgrounds. You tin can think of reflections as showing you what an object tin can "encounter" in any direction. This is the same trouble nosotros need to solve to depict the background for a 3D game-- the game engine needs to know what the player tin run across in any direction.
Many high-quality renderers support spherical environs maps. They are a lot like skyboxes, but are a single paradigm mapped onto a sphere instead of half dozen images mapped onto a cube. Figures iii, iv and v show a simple background consisting of a regular on the ground and a huge dome in the sky. Effigy iii is what the game player sees. Figure 4 is the cubic projection, unwrapped and laid flat, and Figure five is the spherical projection. Find that straight lines in the histrion's view or cubic map plow into curved lines in the spherical map, and vice versa. Spherical maps can be easier to piece of work with because they are stored as a single image. Notwithstanding, interactive graphics hardware and software is designed to display flat surfaces, so cubic environment maps can exist fatigued quicker than spherical maps. The massive distortion of pixels near the n and south poles of a spherical map (see Effigy five) also makes them difficult to create.
Figure 3
Effigy 4
Figure five
Skyboxes are likewise closely related to immersive imaging technologies like Apple tree's QuickTimeVR™ or Live Flick's panorama technology. Immersive imaging products concentrate on the trouble of stitching together photographs to create a 3D surround, and they map the final prototype to a cylinder or partial sphere instead of a cube. Often they limit the view and so you cannot look straight upward or straight downwardly, although creation of total panoramas using special camera lenses or mirrors is condign more mutual. Zork Nemesis™, Zork Grand Inquisitor ™ and The Journeyman Project three™ are three games that accept used panoramic technologies effectively. However, the restrictions on viewer move, also as the difficulty of incorporating fast cylindrical or spherical rendering into polygon-based game engines, limits their use in most games.
At present that you have some background on skyboxes and related technologies, nosotros'll motility on to the nuts and bolts of creating them.
Rendering Skyboxes
Your existing 3D modeling software is a dandy source of skyboxes. You tin utilise weather, mountain, or star-field generation plugins to create most of the scenery, along with the modeling and texturing tools with which you are already familiar.
To create a skybox, return six images of the scene from a unmarried point in space. Set the camera to create square images with a vertical and horizontal field-of-view of ninety°. Then render six views, each xc° autonomously: frontward, left, back, right, up and down.
The resulting images should fit together seamlessly when placed next to each other in Photoshop or viewed with the game engine. If they don't, y'all might exist able to swap and rotate some of the 6 images to become the arrangement required by your game engine, or y'all might have to modify the camera parameters and re-return.
Each of the half dozen foursquare images should be rendered at the same resolution-- for example, 256x256 pixels. Limitations of the game engine and/or hardware texture mapping will make up one's mind the maximum skybox size. Higher resolution skyboxes volition look better, up to a certain point that is adamant by the resolution of the screen and the game photographic camera'south field-of-view*. Pop start-person shooter games like Convulse run with a fixed 90° field-of-view, which makes the calculation like shooting fish in a barrel--if the resolution of each of the six skybox images is equally large as the largest dimension of the screen (e.one thousand. 640x640 if the game is running on a 640x480 screen), then the skybox pixels will not be magnified as they're projected onto the screen. If your game supports larger screen resolutions or a smaller (zoomed-in) field-of-view, yous will demand higher-resolution skyboxes to avoid Bbs: the dreaded Blocky Groundwork Syndrome.
Of course, larger skybox images will employ more texture memory, which might slow the frame charge per unit. Happily, AGP graphics boards (which let regular arrangement retention to be used as texture retentivity) and larger on-board texture memories are the wave of the future.
If you have the luxury of running with bilinear interpolated texturing you lot can use a lower-resolution skybox and get a blurry background instead of a blocky background. Clouds and mountains usually look fuzzy in the real globe, and then turn on bilinear filtering for your backgrounds if you can.
*Mathematically, the best skybox resolution is:
maxScreenResolution * 1/tan(fieldOfView/ii)
If your calculator doesn't have a tangent push, here are some mutual field-of-view values :
90° : i/tan(ninety/2) = ane.0
sixty° : i/tan(threescore/2) » i.7
45° : 1/tan(45/2) » 2.4
The side by side two sections give pace-past-step instructions on creating skyboxes using two pop 3D packages-3DStudio MAX™ and Bryce™.
3DStudio MAX R2 surround maps
3DStudio MAX R2 includes built-in support for cubic environment maps, so creating skyboxes with 3DStudio is particularly convenient. To create a skybox once you accept created the 3DStudio scene:
1. Create a minor box (or sphere or whatever other shape). This represents the game histrion, and will be the center of the skybox.
two. Place the box at the center of your scene, where the player will be continuing.
iii. Edit the box's material (open up the Fabric Editor). Create a standard material with nada shininess/shininess force, zero self-illumination, and aught opacity. Because the box is completely transparent, it volition not show upwards when y'all render the scene (which is what nosotros want, since it is being used but to create a skybox).
Effigy 6
1. Assign a reflection map to the box's material. Open up the Maps section of the textile editor, check the "Reflection" box, and press the "None" push. Then select a new "Reflect/Refract" map from the Material/Map Browser.
2. The textile editor will alter, allowing you to cull Reflect/Refract parameters. Select the post-obit (See Effigy vi):
Source: From File
Size: enter resolution of skybox images, e.g. 256
Return Cubic Map Files To File: enter name of skybox, east.thou. "gamesky.tga"
Printing 'Pick Object and Render Maps'
Pick the box in the main MAX window
3. 3DStudio volition then create the six images of the skybox, and salve them to disk.
The next step depends on your game engine; you may need to catechumen the images into another format, resize them, rename them, etc. 3DStudio MAX uses a right-handed coordinate system with the Z axis 'up', and uses the following conventions for skybox images:
| Table ane: 3DStudio MAX skybox image conventions | |
| View direction | Filename suffix |
| Forward (+Y direction) | _BK.tga |
| Left (-10 direction) | _LF.tga |
| Back (-Y direction) | _FR.tga |
| Right (+X direction) | _RT.tga |
| Upward (+Z direction) | _UP.tga |
| Down (-Z direction) | _DN.tga |
See the section "Reflect/Refract Map" in the 3DStudio MAX R2 reference manual for more information.
Skyboxes from Bryce
Bryce 2 and Bryce 3D from MetaCreations let you create beautiful scenery with very niggling try. They are also cheap. Unfortunately, they aren't designed to exist office of a larger product procedure, and seem to be meliorate for exploratory tinkering than getting a particular job done under budget and on fourth dimension. But they tin can be used to create stunning skyboxes, if you know how.
The full general thought is to convince Bryce to return the vi views that make up a skybox. Specifically:
1. Set the certificate properties so the images rendered will be the correct size and and so they will fit together correctly. Open up the "Document Setup" dialog (meet Figure 7). Blazon in "1:1" for the aspect ratio, and choose a reasonable resolution for the Document Resolution.
2. Exist sure in that location are no objects linked to the view. By default, Bryce links the sun to the view, which will ruin the skybox considering the lighting will shift as each is rendered. To reset, select the Sky&Fog palette, then bring up the "Sky&Fog options" card (click the triangle at the bottom-right of the Heaven&Fog palette; come across Figure 8) and de-select "Link Sun to View".
Effigy 7
three. Position the camera at the centre of the scene, where the player will be standing . Then double-click on the camera trackball to bring up the Camera Options dialog. An early version of Bryce had a problems that caused all field-of-view settings to be ane.25 times bigger than they should be, and compatibility has forced all subsequent versions of Bryce to share that quirk. So, to get a 90° field-of-view in Bryce, you must really enter a value of 112.5° (xc x i.25 = 112.v) into the Camera Options dialog.
4. Select the "Render to Disk" menu entry and render the first skybox image.
5. After rendering is consummate, rotate the camera 90° using the Camera Options dialog and so render again. Render half-dozen times to become a complete skybox. Run into Table 2 for the correct camera rotation values and filename suffixes to create a skybox in the format expected by the Quake 2 game engine.
Effigy 8
| Table ii: Bryce photographic camera setting for Quake II-format skyboxes | |||
| Filename suffix | X | Y | Z |
| ft.tga | 0 | 180 | 0 |
| lf.tga | 0 | Bryce 2: 90 Bryce 3D: -90 | 0 |
| bk.tga | 0 | 0 | 0 |
| rt.tga | 0 | Bryce 2: -ninety Bryce 3D: ninety | 0 |
| up.tga | -90 | 90 | 0 |
| dn.tga | 90 | 90 | 0 |
It will have Bryce anywhere from ten minutes to several hours to return each epitome. A good trick is to salvage the scene six times, to 6 different files, with dissimilar camera parameters. Drag and drib all six files onto the Bryce executable's icon to render them in a batch mode overnight. See Figure ix for an example created using Bryce 3D.
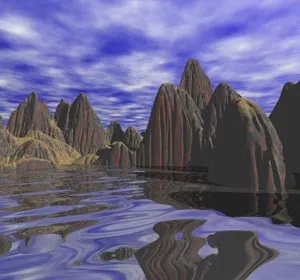
Figure 9
Creating a simple 3D scene using a tool like Bryce or 3Dstudio is quick and easy. But what if you want to put trees on a mountain or create a particular pattern of clouds in the heaven? One time you accept an initial skybox, it is often easier to use a paint program to add together or alter scenery instead of going dorsum to the modeling tool and creating geometry for every afar object. The side by side section describes tools and techniques for painting skyboxes.
Painting Skyboxes
Y'all might recall editing skyboxes is like shooting fish in a barrel-after all, a skybox is simply six images, and at that place are plenty of great tools for image editing. The trouble is making the edges of each image mesh with its neighboring images. Any mismatch will shatter the of a continuous background; instead, the player volition feel trapped within a big box. Getting this correct is made even more difficult by the sharp changes in perspective that occur at the edges of the skybox. Figure 10 shows the looking-forward and looking-right images from a skybox created by Cyro Baretto in 3DStudio; notice that they friction match perfectly, but straight lines change direction at the edge where the ii images meet.
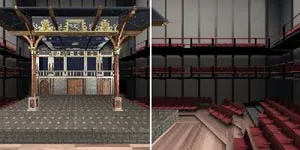
Figure ten
Instead of editing each of the six skybox images, it would be better if there was a tool that allow y'all edit an 'in the game' view of the skybox. You would then come across exactly what the game player will encounter, and would be able to edit whatever view of the skybox. This mythical tool actually exists, and is chosen SkyPaint.
SkyPaint reads skybox images and displays an arbitrary view into the skybox. For example, Figure 11 shows SkyPaint displaying a 45° view into the skybox of Figure 10. If there is an area that needs tweaking, or you want to paint some added item, SkyPaint runs a paint programme such as Photoshop™, where yous edit the in-game view equally an ordinary 2D paradigm.
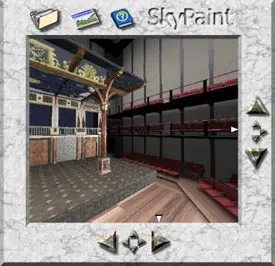
Figure 11
When you lot're done painting, SkyPaint applies the changes to the skybox images, applying the proper perspective projections. You can concentrate on the artwork and let your reckoner do the math to avoid ugly artifacts at the corners and edges of the skybox.
SkyPaint also translates betwixt spherical and cubical environment maps, reading and writing popular skybox, environment map, and photographic panorama file formats. Visit http://www.skypaint.com/ for more information on SkyPaint, to encounter some interactive Java-powered skybox demos, to download a gratis trial version, or to visit my home page (I'1000 the author of both this commodity and SkyPaint).
Global operations like changing the color balance or brightness of the unabridged skybox don't require a special tool. You tin just edit each of the half-dozen images individually. If you need to convert to a 256-colour palette, converting the images one by-i also works perfectly well, as long as you employ the same palette for all six images. You'll relieve fourth dimension if you use an image processing tool with batch-processing capabilities like DeBabelizer™
Once you have a dainty-looking skybox, the simply task left is to integrate it into your game. The adjacent section illustrates some of the problems yous might meet by looking at one particular game engine-the Quake Ii engine.
Game engine integration
Game engines typically treat skyboxes as a special type of texture, drawn behind all other objects and animated every bit the role player moves. The restrictions and requirements for skybox textures depend on the game engine. They may be the same as for other textures, or there may exist special requirements for skyboxes.
As a specific example, the Quake II game engine has the following requirements: Convulse Two skyboxes use the same arrangement every bit the cubic environment maps of 3DStudio R4 (the onetime 3DStudio, non 3DStudio MAX). See Figure 12 for the orientation and naming conventions for Quake Ii skyboxes.
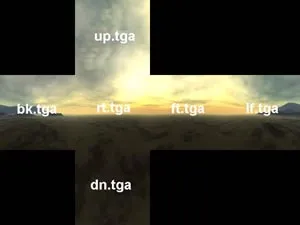
Figure 12
Each skybox in Quake II is stored as 2 sets of 6 files:
- Six total-colour tga-format images are used when a hardware accelerator is detected and the game is running in full-color mode.
- Another set of 256-colour pcx-format images is used when at that place is no hardware accelerator and the game is running in 256-color mode. The skybox images share the same color palette every bit the residue of the scene, and must exist 256x256 pixels big.
Figure xiii shows both a full-colour (256x256x6, 24bit) skybox and its low-color (256x256x6, 8bit) version every bit rendered past Quake Ii.
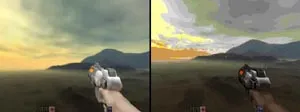
Figure 13
No mip-maps (lower resolution versions of a texture) are allowed or required for skyboxes. Mip-maps are merely used when the textured object is far away and a single pixel on the screen corresponds to several pixels in the texture map. That never happens to skybox textures, considering the player never gets closer or farther from the background, and Quake II does not allow zooming-in by changing the camera's field-of-view. The adjacent section of this article describes a few creative uses for skyboxes that you might want to explore after you lot have simple skyboxes working in your game.
Other Uses and Advanced Techniques
Skyboxes are useful as temporary stand-ins for scenery that will exist created later. During prototyping and early game development, you can rapidly rough-out a scene and render a skybox. And then paint directly onto the skybox (either using SkyPaint or straight onto the six images) to add details instead of spending hours modeling and texturing a scene that might exist used only for an early on proof-of-concept demo. A skybox is a lot more interactive than a 2d sketch, is easier to create than a full 3D scene, and doesn't require a fully complete and optimized game engine to give a good demo.
If the player'southward motility is somewhat restricted and you have plenty of memory and CD-ROM space, you lot tin use multiple skyboxes, and switch between them as the actor moved through the scene. This is especially effective if you can hide the switching. A perfect example would be a game set in a colony on the Moon, with a network of transparent domes connected by opaque tunnels. Each dome would have its own skybox, showing a unlike view of the surface, with the tunnels operation every bit transitions.
Taken to an farthermost, we would create a skybox at every possible viewpoint in the game. Instead of drawing polygons, the game engine would switch between skyboxes equally the player walked around. That's not every bit far-fetched equally it sounds-this type of image-based rendering is a popular research topic these days. And when almost PCs have ii gigabytes of memory, information technology might fifty-fifty become practical.
Another effective technique is using animated skyboxes for afar objects. Examples include moving clouds, a sunrise-day-dusk-night cycle, or peradventure a distant erupting volcano. Creation is straightforward-- apply 6 movies instead of vi images for the skybox. Finding plenty memory and CD-ROM space for the animations and disarming the game engine programmers to support animated skyboxes may be more difficult.
While you're lobbying for blithe skybox support, you lot might also enquire for reflection map support. Your game will expect much more disarming if the moonscape groundwork is reflected in the other players' visors. Yous may have more success if you imply that any competent programmer should accept no problem implementing a well-known 22-year-sometime computer graphics technique.
A largely unexplored source of scenery for games is the existent world. There are several tools for creating panoramas from photographs of real places, such as Live Picture's Photograph Vista™ software, Apple tree's QuickTimeVR Authoring StudioTM, and Kaidan's camera tripod hardware. Finding a lensman or studio familiar with "immersive imaging" is getting easier all the time; search the spider web for the phrase "QTVR" to encounter lots of examples. I am surprised that nobody has created a Myst™-like game with photographic backgrounds taken in a beautiful identify like Hawaii, Yosemite, or Paris.
Conclusion
Every bit I write this, thunderstorms are rolling by my window, giving the mean solar day a schizophrenic mood. Bright sunshine is interrupted by dark clouds, thunder, and pouring rain. Yesterday felt calm and relaxed--fluffy white clouds blew across a bright blueish sky.
Your game's groundwork volition fix a mood. Today's fast game engines permit y'all choose arbitrary images equally the background, from romantic sunsets to strange, alien green skies. One day, game engines will incorporate full weather condition simulations, displaying realistic and ever-changing backgrounds of clouds rolling across the landscape. Until then, skyboxes are an almost perfect substitute.

How To Make A Game Design Background,
Source: https://www.gamedeveloper.com/art/creating-backgrounds-for-3d-games
Posted by: lipseyforged.blogspot.com
0 Response to "How To Make A Game Design Background"
Post a Comment